


Install Luvio from the .deb or .rpm package
This guide installs the Luvio server on one Linux machine, physical or virtual, with the package
of your distribution. Everything Luvio needs comes in the package: its own Node.js runtime, its own
PostgreSQL database and the qemu-img tool. The machine needs no Internet access during the
installation.
At the end of this guide, the Luvio web console answers on http://<server>:3080 and
https://<server>:3443, and you go on with First setup. Everything else, the
database included, is set in the web console.
Before you begin
Section titled “Before you begin”You need:
-
A Linux machine with x86-64 or ARM64 processors and one of these distributions, or a later release:
Family Releases Red Hat Enterprise Linux, Rocky Linux, AlmaLinux, Oracle Linux 8, 9, 10 Debian 10 and later Ubuntu 20.04 LTS and later Any distribution with glibc 2.28 or later and systemd works. This guide was validated on Ubuntu 24.04 LTS and Rocky Linux 9.
-
At least 2 vCPU, 4 GB of RAM and 40 GB of disk for
/var/lib/luvio. Plan more disk if you use Universal Templates (see Plan your installation). -
An account with
sudorights. -
A fixed IP address or a DNS name for the server: the virtual machines connect back to it.
-
The time of the server synchronized with NTP (chrony or systemd-timesyncd).
Nothing else must listen on TCP ports 3080 and 3443 (web console and agents, in HTTP and
HTTPS) or 15432 (the database Luvio runs for itself, on 127.0.0.1 only).
1. Download the package
Section titled “1. Download the package”Download the package that matches your distribution and processor from <DOWNLOAD_URL>:
| Distribution | x86-64 | ARM64 |
|---|---|---|
| Debian, Ubuntu | luvio_<version>_amd64.deb |
luvio_<version>_arm64.deb |
| Red Hat and rebuilds | luvio-<version>-1.x86_64.rpm |
luvio-<version>-1.aarch64.rpm |
To check which processor the machine has, run uname -m: x86_64 or aarch64.
Copy the file to the server, for example with scp, then check that it arrived intact. Compare
the result with the SHA-256 published next to the download:
sha256sum luvio_<version>_amd64.deb2. Install the package
Section titled “2. Install the package”On Debian or Ubuntu:
sudo apt install ./luvio_<version>_amd64.debOn Red Hat Enterprise Linux, Rocky Linux, AlmaLinux or Oracle Linux:
sudo dnf install ./luvio-<version>-1.x86_64.rpmKeep the ./: it tells the package manager to install the local file.
The installation:
-
creates the
luviosystem account; -
installs Luvio in
/opt/luvio; -
writes two secrets generated for this server to
/etc/luvio/luvio.env; -
creates the data directory
/var/lib/luvio, which holds the database; -
starts two services,
luvio(web console, API) andluvio-transfer(template transfers), and enables them at boot; -
opens TCP ports 3080 and 3443 in the firewall when firewalld or ufw is active. It prints what it did:
Luvio: opened TCP port 3080 in the firewalld zone public.Luvio: opened TCP port 3443 in the firewalld zone public.From then on, the firewall follows the ports Luvio listens on (
luvio-firewall.path): when you change a port in the web console, the new one opens and the old one closes.
3. Check that Luvio runs
Section titled “3. Check that Luvio runs”-
Check the two services:
Terminal window systemctl status luvio luvio-transferBoth must be
active (running). The first start takes up to a minute: Luvio creates its database. -
Check that the web server answers and that its database is ready:
Terminal window curl -fsS http://localhost:3080/readyzThe answer starts with
{"status":"ready". -
From your workstation, open
http://<server>:3080in a browser. The Welcome to Luvio page appears.
If something fails, see Troubleshooting.
4. Save the encryption key
Section titled “4. Save the encryption key”/etc/luvio/luvio.env holds CONFIG_ENCRYPTION_KEY. Luvio encrypts with it the hypervisor
passwords and the other secrets it stores in its database. Without this key, a backup of the
database cannot be restored. Copy the file to your password safe or your backup system now:
sudo cat /etc/luvio/luvio.envNever change CONFIG_ENCRYPTION_KEY or SESSION_SECRET afterwards.
5. Go on with the first setup
Section titled “5. Go on with the first setup”Open http://<server>:3080 and follow First setup.
Settings
Section titled “Settings”Set the server in the web console, not in a file:
| Setting | Where | Default |
|---|---|---|
| Database: Luvio’s own PostgreSQL, or yours | The setup wizard (First setup), then Administration > Server & storage > Luvio Database | Luvio’s own |
| Server URL: the address the agents connect to | Administration > Server & storage | The IP address of the server |
| Protocol: HTTP, HTTPS or both | Administration > Server & storage | HTTP+HTTPS |
| HTTP port, HTTPS port | Administration > Server & storage | 3080, 3443 |
| Reverse proxy in front of Luvio | TRUSTED_PROXIES in /etc/luvio/luvio.env: see Behind a reverse proxy |
Not set |
Change the protocol or a port
Section titled “Change the protocol or a port”-
In Administration > Server & storage, click the pencil next to Protocol, HTTP port or HTTPS port, choose or type the new value, then click the check mark.
-
Luvio opens the new port next to the current one, in the firewall too. When the address you use stays (you add HTTPS, for example), the change is kept at once. Otherwise Confirm the new address opens: click Open the new address. The web console opens there and says New settings kept.
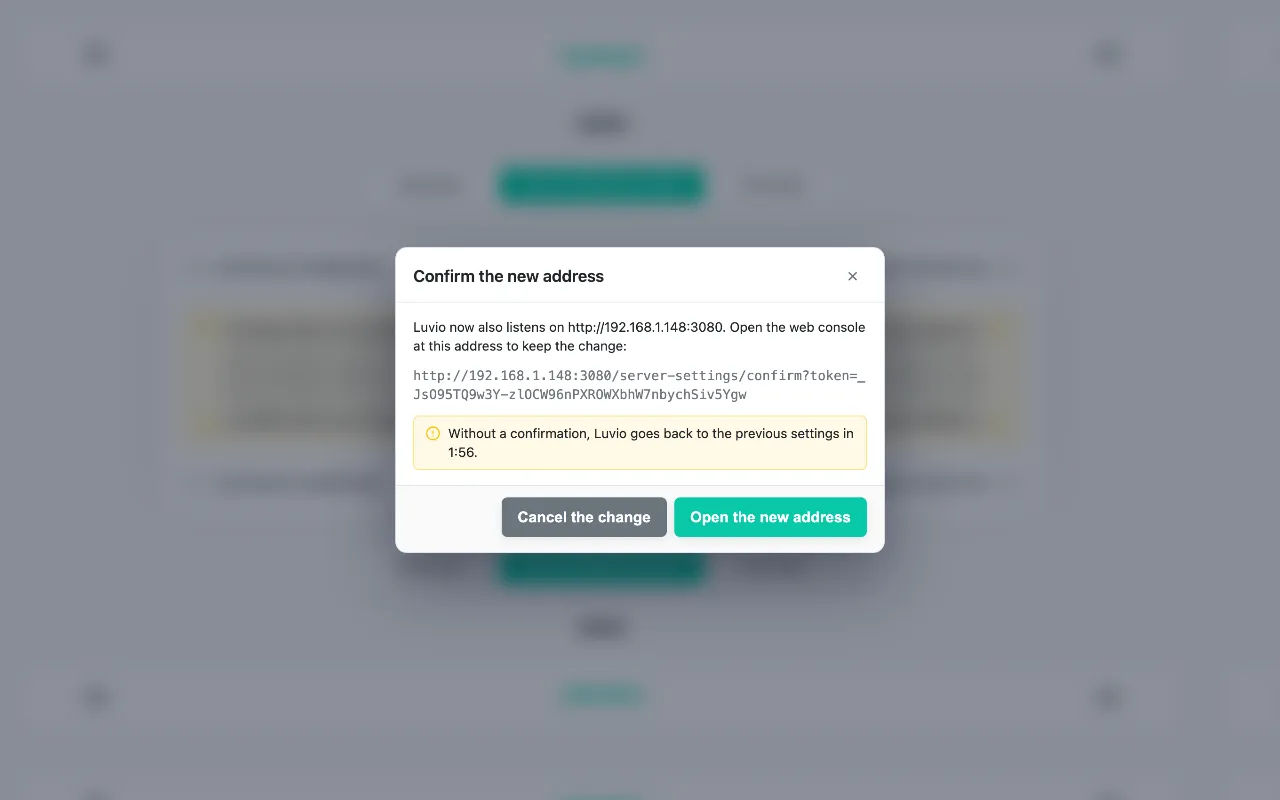
Without the confirmation, Luvio goes back to the previous settings after two minutes: a port your browser cannot reach (a firewall in front of the server, a certificate it refuses) never locks you out.
-
Luvio sends the new address to the agents. The previous port keeps serving until every running virtual machine has it, at most 15 minutes, then it closes, in the firewall too.
Luvio does not restart for it. The users of the desktop client who typed the old address must type the new one.
With both, port 3080 stays open for the agents, the desktop clients, the identity providers and
the health checks, and the web console moves to HTTPS: a browser that opens
http://<server>:3080 is sent to https://<server>:3443, and the sign-in and the console’s API
refuse HTTP. A session opened over HTTPS has its own cookie, which browsers never send over HTTP.
HTTP requests from the server itself, and those of a trusted reverse proxy
(below), still reach the console over HTTP.
With both protocols (the default), the agents connect in HTTPS.
Behind a reverse proxy
Section titled “Behind a reverse proxy”To serve the web console through a reverse proxy, set TRUSTED_PROXIES in /etc/luvio/luvio.env
to the address the proxy connects from: IP addresses or networks (CIDR), separated by commas,
127.0.0.1 for a proxy on the server itself. Then restart the services.
Luvio then reads the X-Forwarded-For, X-Forwarded-Proto and X-Forwarded-Host headers that
the proxy adds: it sees the users’ own addresses (the sign-in limits count per address), and
knows when the proxy serves HTTPS. A session opened through an HTTPS proxy then gets a Secure
cookie, and the answers carry HSTS. Luvio ignores these headers from any other address. With
both, a browser that reaches port 3080 directly is still sent to HTTPS; requests of a trusted
proxy are served, over HTTP or HTTPS as the proxy reports: make the proxy send its own HTTP
visitors to HTTPS.
Without the setting, every user has the address of the proxy, and a session opened through an
HTTPS proxy gets a cookie without Secure. Trust nothing but the proxy: a client that connects
from a trusted address can choose the address and the protocol that Luvio sees.
Use your own PostgreSQL
Section titled “Use your own PostgreSQL”Luvio can store its data in a PostgreSQL server of your own (PostgreSQL 12 or later) instead of the one it runs itself:
- At the first setup: create a PostgreSQL account for Luvio with the
CREATEDBright, or an emptyluviodatabase it owns. In the Database step of the wizard, choose Your PostgreSQL server, then click Restart with this database. Luvio restarts, the page reloads by itself and asks for the address, the account and the password of the database (First setup). - Later: create an empty database owned by Luvio’s account. In Administration > Server & storage > Luvio Database, click a pencil, choose External, fill in the connection, then click Apply mode change and Migrate data then switch: Luvio copies its data there. Click Restart now when it asks.
Settings in luvio.env
Section titled “Settings in luvio.env”/etc/luvio/luvio.env holds the secrets and what Luvio needs before its database answers. A
setting of the web console can also be set there: it then wins over the web console, which shows it
with From environment and does not let you change it. Keep the lines commented out, unless the
web console cannot help any more (for example, the server is behind a firewall you cannot change and
nobody reaches its port). Uncomment a line, set it, then restart both services:
sudoedit /etc/luvio/luvio.envsudo systemctl restart luvio luvio-transfer| Line | Sets |
|---|---|
SERVER_PROTOCOL |
http, https or both |
HTTP_PORT, HTTPS_PORT |
The ports of the listeners |
PUBLIC_HOSTNAME |
The host of the Server URL: a DNS name or an IP address, without http:// and without a port |
VDI_DB_MODE |
embedded or external; with external, DATABASE_URL or PGHOST, PGPORT, PGUSER, PGPASSWORD, PGDATABASE (and PGSSLMODE=require for TLS) set the connection |
To give a setting back to the web console, comment its line out again and restart the services. The firewall follows a port set here too.
Upgrade
Section titled “Upgrade”From the web console
Section titled “From the web console”Each release has an update file per architecture, luvio-<new version>-linux-amd64.luvio-update
(or -linux-arm64), next to the packages. It holds the .deb and the .rpm and is signed by
Luvio.
- Go to Administration > Updates and drop the file on the page. Luvio checks its signature, that it fits this machine and that it is newer than the installed version, and shows its release notes.
- Press Install. Luvio waits for the running tasks, backs up its database to
/var/lib/luvio/backups/pre-update-<old>-to-<new>-<date>.dump, then installs the package and restarts. The browser shows an update screen, then reloads the console.
The installation is done by luvio-update.service, which runs as root when the server asks for it
(luvio-update.path); the server itself never runs as root. If the new version does not start
within ten minutes (thirty when it upgrades PostgreSQL), it reinstalls the previous package and
the console says the update was rolled back. The first update from the console has no previous
package to go back to: it stops with the error. The log of each update is in
/var/lib/luvio/updates/runner/<run>.log; sudo journalctl -u luvio-update shows the runs.
From the command line
Section titled “From the command line”Install the new package the same way as the first time:
sudo apt install ./luvio_<new version>_amd64.deb # Debian, Ubuntusudo dnf install ./luvio-<new version>-1.x86_64.rpm # Red Hat and rebuildsTake a backup first.
Either way
Section titled “Either way”The package keeps /etc/luvio/luvio.env and /var/lib/luvio, and restarts the services. It does
not touch the firewall again.
Then upgrade the agents: the Luvio server and its agents must be the same release, and an agent older than the server refuses its settings and its commands (see Upgrade Luvio and every agent together in Templates, agent and pools).
Universal Templates on Proxmox VE: from a version that did not check the SSH host keys of the nodes, copies stop until you trust the key of each node, in the Universal Templates panel of the hypervisor (see Universal Templates).
Releases before the web console set them wrote SERVER_PROTOCOL=http, HTTP_PORT=3080,
HTTPS_PORT=3443 and VDI_DB_MODE=embedded in luvio.env. The upgrade comments those exact lines
out and hands them to the web console with the same values: Luvio keeps serving HTTP on 3080, and
you change the protocol and the ports in Administration > Server & storage. A value you had
changed yourself stays in luvio.env and keeps winning over the web console.
When a new version of Luvio brings a new major version of PostgreSQL, the first start upgrades the
database by itself. Before that, it writes a full backup to
/var/lib/luvio/backups/pre-upgrade-<old>-to-<new>-<date>.dump and keeps the old database as
/var/lib/luvio/pgdata.old-<old>. Once you have checked that Luvio works, delete both.
Back up and restore
Section titled “Back up and restore”A backup is two things: /etc/luvio/luvio.env (the keys) and /var/lib/luvio (the database and
the data). The simplest complete backup stops Luvio for a moment:
sudo systemctl stop luvio-transfer luviosudo tar -czf luvio-backup-$(date +%F).tar.gz /etc/luvio /var/lib/luviosudo systemctl start luvio luvio-transferKeep the archive outside the server: it contains the keys.
To restore it on a machine where the same version of the package is installed:
sudo systemctl stop luvio-transfer luviosudo rm -rf /var/lib/luviosudo tar -xzf luvio-backup-<date>.tar.gz -C /sudo systemctl start luvio luvio-transferA restore brings Luvio back to the time of the backup: desktops created after it are unknown to Luvio; delete them from the hypervisor.
Without stopping Luvio, an administrator can also download the database from the web console:
Administration > Server & storage > Luvio Database > Export database. Keep
luvio.env with it.
Uninstall
Section titled “Uninstall”sudo apt remove luvio # Debian, Ubuntusudo dnf remove luvio # Red Hat and rebuildsThe package stops the services and closes the firewall ports it opened. It keeps your data in
/var/lib/luvio and your settings in /etc/luvio: installing the package again finds them. To
delete them too, after a backup:
sudo rm -rf /var/lib/luvio /etc/luvioTroubleshooting
Section titled “Troubleshooting”Read the logs of the server first:
journalctl -u luvio -e # the last linesjournalctl -u luvio -f # follow them livejournalctl -u luvio-transfer -e # template transfers| Symptom | Cause and fix |
|---|---|
luvio restarts in a loop, the log says the port is in use |
Another program listens on 3080, 3443 or 15432: sudo ss -ltnp | grep -E ':3080|:3443|:15432'. Stop it, or set another port in luvio.env (Settings in luvio.env). |
| A port change says Luvio cannot listen on port … | Another program uses that port, or the system reserves it (ports below 1024). Nothing was changed: choose another port. |
| The new address does not open after a change of protocol or port | A firewall in front of the server blocks it, or the browser refuses the certificate. Wait two minutes: Luvio goes back to the previous settings, and the previous address works again. |
The page does not open from another computer, curl on the server works |
The firewall blocks the port. Run sudo /opt/luvio/bin/luvio-firewall open, or open the port in your own firewall (a network firewall, nftables rules…). The log of the firewall: journalctl -u luvio-firewall. |
luvio does not start after an upgrade and the log mentions pg_upgrade |
The automatic database upgrade failed. The old database is untouched: see the log, and contact <SUPPORT_CONTACT> with it. |
| The log says the database binaries are older than the cluster | A package older than the one that created the database was installed. Install the newer version again. |
Unsupported state or unable to authenticate data in the log |
CONFIG_ENCRYPTION_KEY in luvio.env is not the key the database was encrypted with. Put back the original file. |