


Templates, agent and pools
Your users’ desktops are virtual machines that Luvio deploys from a template: a virtual machine in which you installed the operating system, the hypervisor’s guest tools and the Luvio agent, and that Luvio then sealed (“finalized”). A pool deploys desktops from a template and says who may use them.
This page takes you from an empty hypervisor to a pool your users can open. In the web console, the Getting started list of the Pool Manager page follows the same steps.
1. Get the agent ISO
Section titled “1. Get the agent ISO”The agent comes as an ISO image that Luvio mounts in the template’s virtual machine. Download the
one of your desktops’ operating system from <DOWNLOAD_URL>:
| Desktops | Agent ISO | What it holds |
|---|---|---|
| Windows, x86-64 | Luvio-Agent-windows-x64-<version>.iso |
The installer Luvio-Agent-windows-x64-<version>.msi |
| Windows, ARM64 | Luvio-Agent-windows-arm64-<version>.iso |
The installer Luvio-Agent-windows-arm64-<version>.msi |
| Linux, x86-64 | Luvio-Agent-linux-x64-<version>.iso |
install.sh and the .deb and .rpm packages |
Supported desktop systems:
| Family | Systems |
|---|---|
| Windows | Windows 11 (22H2 or later) and Windows Server 2025, x86-64 or ARM64 |
Linux, .deb |
Ubuntu 24.04 and 26.04, Debian 13 |
Linux, .rpm |
Fedora 44 |
| Linux desktops | GNOME (Wayland or X11), KDE Plasma 6.3 or later (Wayland), XFCE (X11, with the extra package luvio-agent-xfce) |
You upload the ISO to the hypervisor from the web console at step 3. You can also copy it yourself to the ISO storage of the hypervisor (Proxmox) or to a datastore (vSphere): Luvio lists the ISO images found there.
2. Define the operating system
Section titled “2. Define the operating system”Luvio creates the template’s virtual machine with the installation ISO of its operating system.
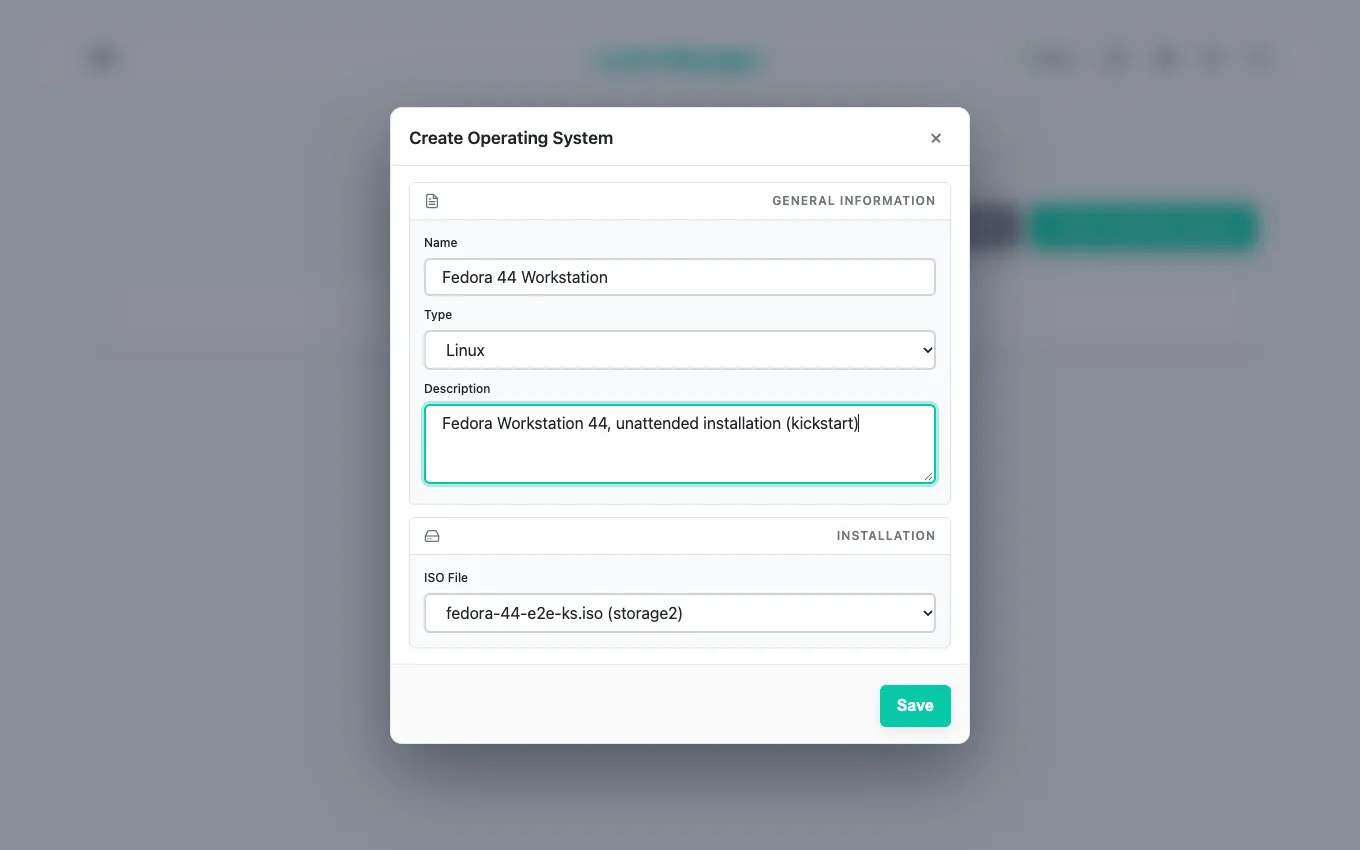
- Upload the installation ISO (Windows, Ubuntu, Fedora…) to the hypervisor: in the web console, open the menu, then Operating Systems > Manage ISO Files > Upload ISO. An ISO already on the hypervisor’s ISO storage appears in the list without upload.
- Click Create Operating System and fill in:
- Name, for example
Windows 11 24H2orUbuntu 24.04 Desktop; - Type:
WindowsorLinux; - ISO File: the installation ISO;
- Windows on Proxmox: the Driver ISO of the VirtIO drivers (Download latest fetches it from the Internet, or upload it);
- Windows 11 on vSphere: a key provider for the virtual TPM (panel Key provider (vTPM); see the VMware vSphere setup guide).
- Name, for example
- Click Save.
3. Create the template
Section titled “3. Create the template”-
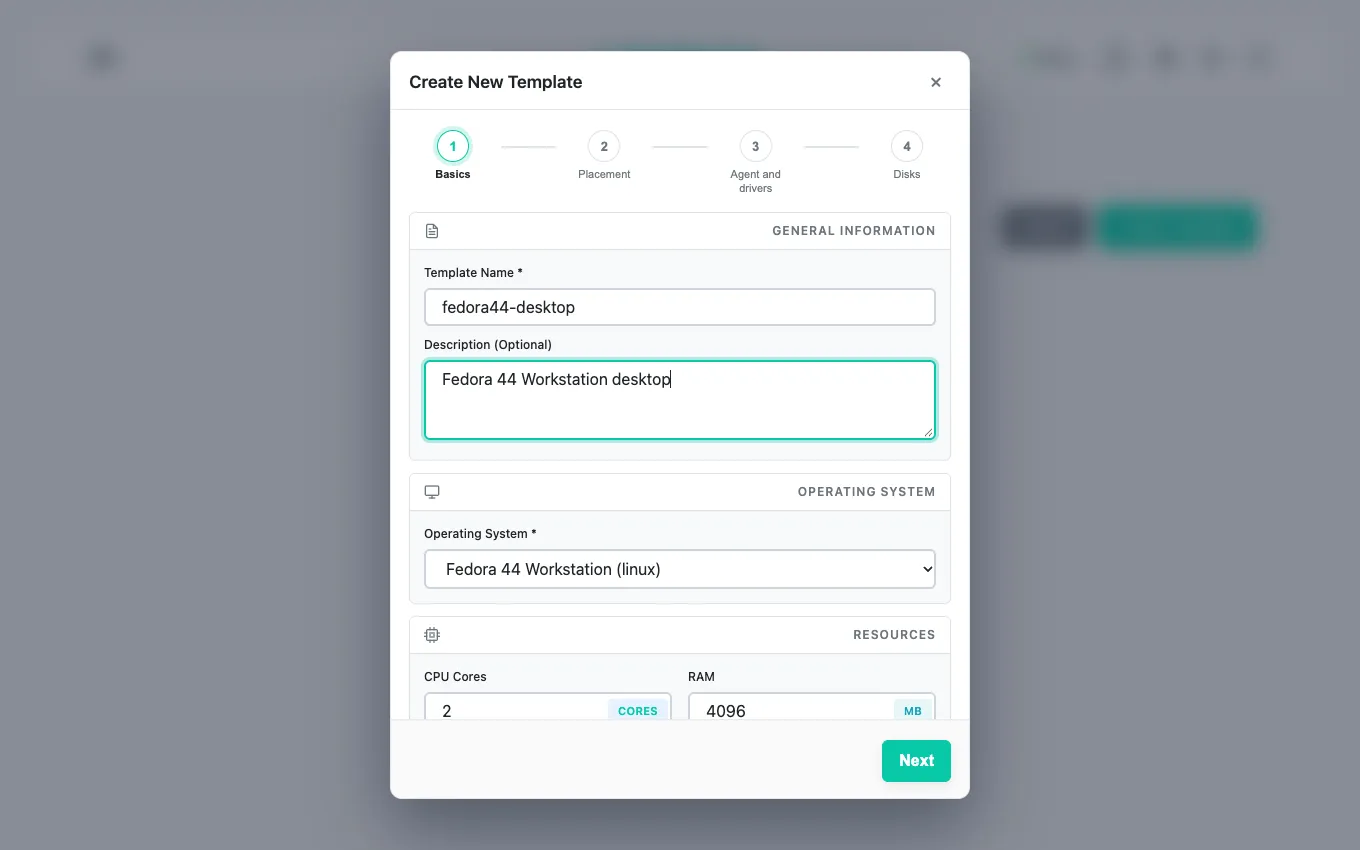
Open the menu, then Template Manager, and click Create Template.
-
Basics: a Template Name, the Operating System of step 2, the CPU Cores and the RAM of the desktops. Windows needs at least 6144 MB of RAM.
-
Placement: the Template storage and the Network of the desktops (a Proxmox bridge or a vSphere port group), and a VLAN tag if needed. The desktops must reach the Luvio server and be reached by the users’ computers (see Network flows).
-
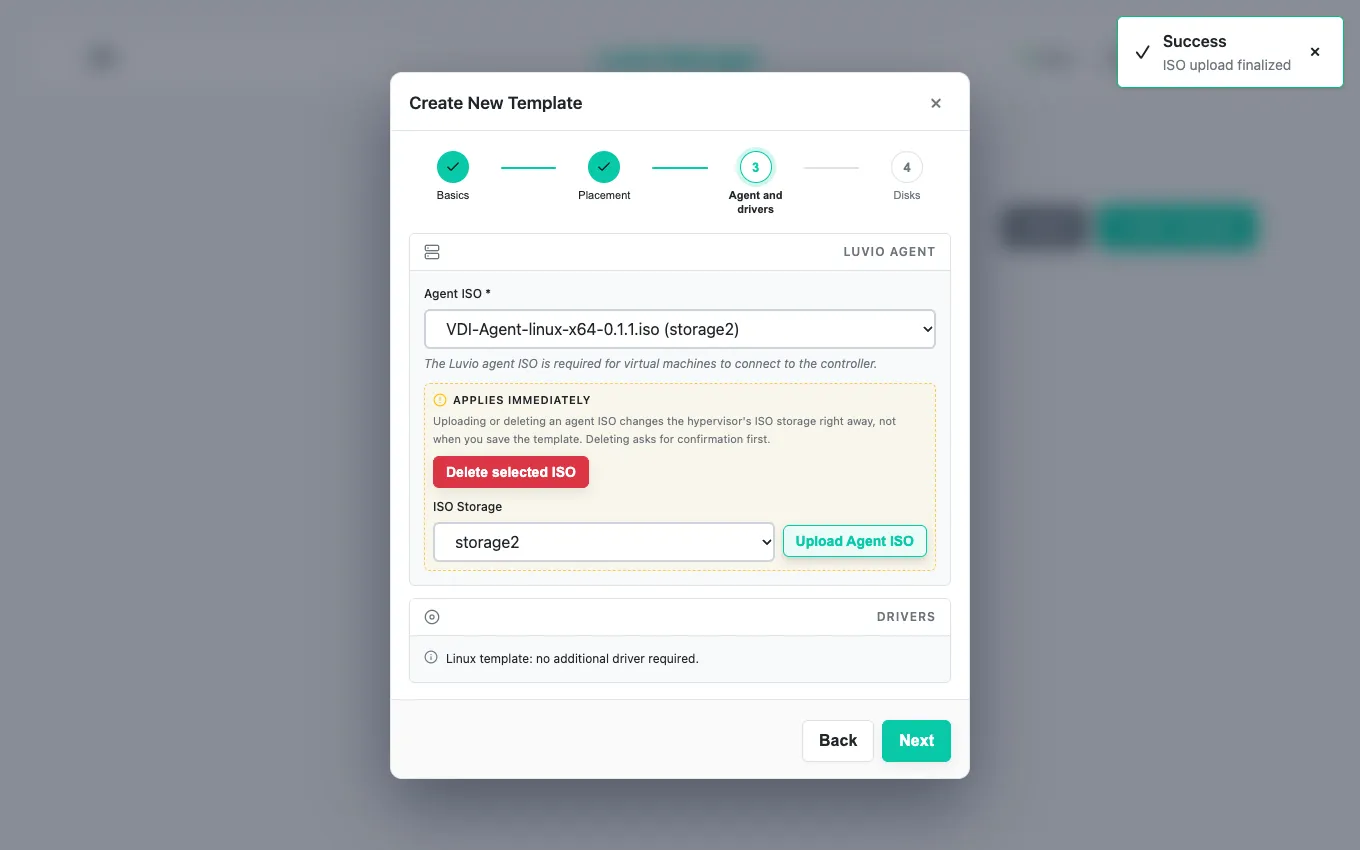
Agent and drivers: in Luvio Agent, choose the Agent ISO. The list shows the agent ISOs of the operating system of step 2 (Windows or Linux), and Luvio selects one for you: the agent ISO of Administration > Updates if you dropped one there, else the newest. Keep the file names of step 1: a renamed ISO is still listed, but Luvio cannot tell which agent it holds. To upload it, choose the ISO Storage, click Upload Agent ISO and select the file of step 1.
-
Disks: the size of the system disk (50 GB by default). Then click Save.
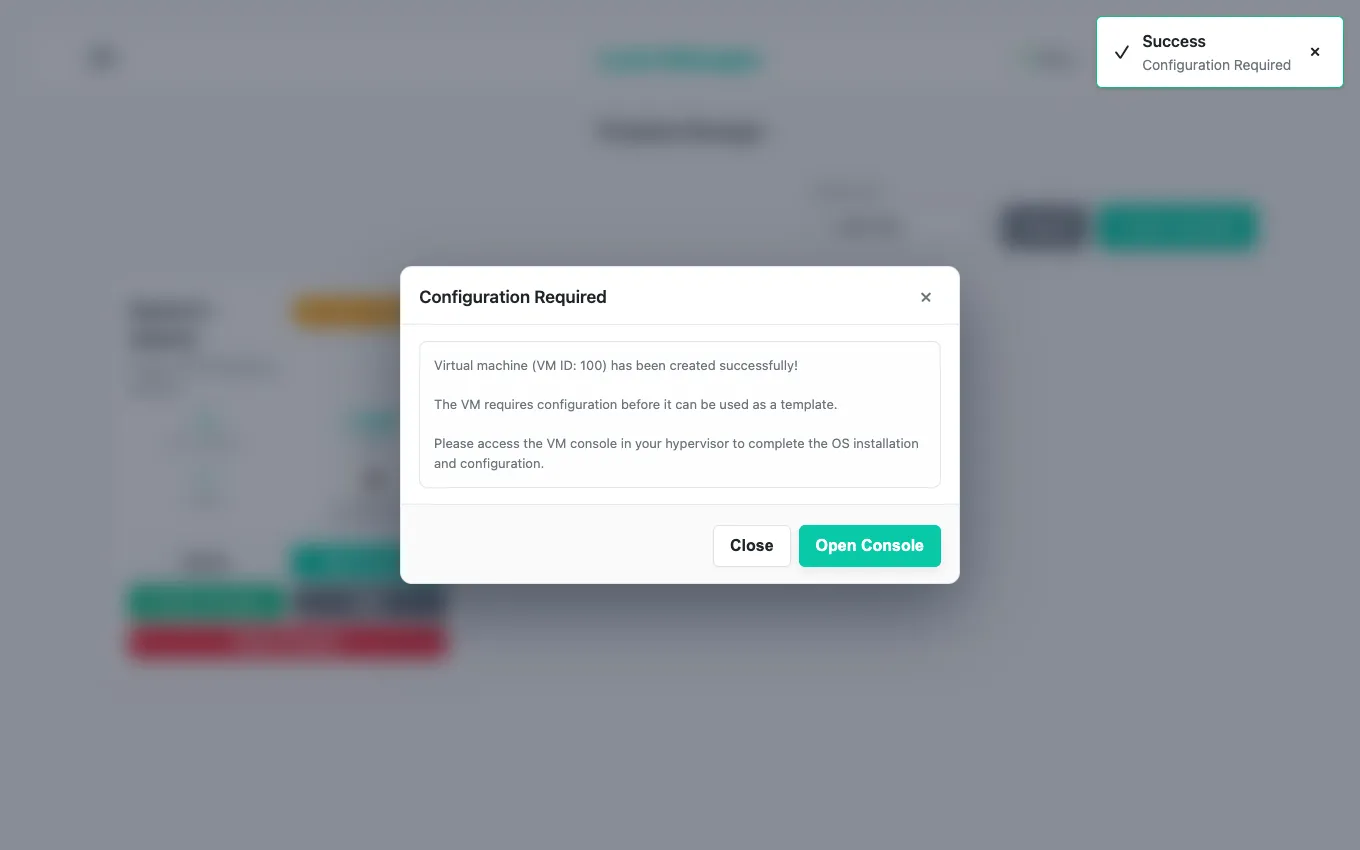
Luvio creates the virtual machine, with the installation ISO and the agent ISO in two CD drives, and shows Configuration Required. The template appears as Pending Configuration. The machine stays stopped until you start its installation at step 4.
4. Install the system and the agent
Section titled “4. Install the system and the agent”Click Open Console in Configuration Required, or on the template. The console of the virtual machine opens in a Luvio window, with the machine still stopped, on vSphere as on Proxmox VE: you do not sign in to the hypervisor. The bar of the window also stops and restarts the machine.
-
Click Start installation. The machine starts from the installation ISO. A Windows ISO asks to “Press any key to boot from CD or DVD” for a few seconds only: Luvio presses the key for you, through the hypervisor, during the first 10 seconds. You have nothing to press, even if the console connects after the prompt. A Linux ISO starts its installer by itself.
If Luvio could not press the key (a message says so), press a key in the console while the prompt shows. If it has passed, send Ctrl+Alt+Del to restart the machine and press a key at the prompt.
If you edit the template while its machine runs, and the change stops the machine (processors, memory, disks, or a storage move) or creates it again (operating system or ISO), Luvio starts it again the same way and presses the key for you. If Luvio could not press the key, the task of the change says so; once the system is installed, ignore it: the machine starts from its disk. A machine that was stopped stays stopped.
-
Install the operating system as usual. If the installer powers the machine off at the end, click Start the VM in the console window: the machine now starts from its disk. Once Luvio has started the installation, Start the VM comes first; Start installation stays available in case the installer did not start. A suspended machine only offers Resume the VM. Create the accounts your users will sign in with, or join the machine to your domain.
-
Install the guest tools of the hypervisor. Luvio needs them to learn the address of each desktop:
- Proxmox: the QEMU guest agent: on Windows,
virtio-win-guest-tools.exefrom the VirtIO driver ISO; on Linux, theqemu-guest-agentpackage (sudo apt install qemu-guest-agentorsudo dnf install qemu-guest-agent). - vSphere: VMware Tools on Windows,
open-vm-toolson Linux.
- Proxmox: the QEMU guest agent: on Windows,
-
Install the Luvio agent. Luvio can install it for you once the guest tools of step 3 run: on the template’s card, Guest tools shows that they answer; click Install agent (also in the bar of the console window), then Install. Luvio runs the installer of the agent CD drive through the guest tools, restarts the machine (always on Linux, on Windows when the installer asks for it), waits for the agent and pairs it with your Luvio server: no other server can then take it. The window follows the installation; you can close it, the card shows Installing… until it ends. On vSphere, VMware Tools run nothing without an account of the machine: give the user name and the password of an administrator of the virtual machine (on Linux,
rootor an account that can usesudo; on Windows, any administrator). Luvio uses them for this installation only, and does not store them. On Windows, an administrator other than the built-inAdministratormay have to confirm the installation, as for any software (seen only with accounts that are not administrators: VMware Tools gives administrators their full rights): the window says so; sign in to Windows with that account in the console, click the shield blinking in the taskbar, then Yes.On Fedora and Red Hat-like systems on Proxmox, SELinux confines the QEMU guest agent: what it runs can neither mount the CD nor run the package manager. Luvio then asks UDisks2 to mount the CD and PackageKit to install the agent’s package, which the confinement allows (both are part of Fedora Workstation); nothing to change in SELinux. Where they are missing (a minimal or server installation), the window says so: install them (
sudo dnf install PackageKit udisks2) and try again, or install the agent by hand (below). If the installation fails, the window says why, and Show the log shows the end of the installer’s log.To install the agent yourself instead, from the agent CD drive:
-
Windows: open the drive labelled
LUVIOAGENT_X64in the file explorer and runLuvio-Agent-windows-x64-<version>.msi. For a silent installation, in an administrator command prompt:msiexec /i D:\Luvio-Agent-windows-x64-<version>.msi /qn(replaceD:with the drive letter). -
Linux: in a terminal, mount the drive and run its installer:
Terminal window sudo mount -o ro /dev/disk/by-label/LUVIOAGENT_X64 /mntsudo bash /mnt/install.shsudo umount /mntThe installer picks the
.debor the.rpmfor the distribution. On an XFCE desktop it also installsluvio-agent-xfce, the screen locker the agent needs there, when XFCE is the only desktop of the machine; with another desktop beside it, runsudo bash /mnt/install.sh --xfceif your users sign in to XFCE. On Linux, the agent becomes the login screen of the machine (it replaces GDM, SDDM or LightDM): restart the machine after the installation.
On Windows, the agent also installs a virtual display, which it uses only while a user streams the desktop. Windows can briefly extend the desktop to it during the installation; the agent then puts the desktop and the sign-in screen back on the display of the virtual machine, so the console stays usable, after a restart too.
The agent opens its ports (TCP 8081 and UDP 4433) in the firewall on Windows and on Linux with firewalld. On Linux with ufw, open them yourself:
sudo ufw allow 8081/tcp && sudo ufw allow 4433/udp. -
-
Install your applications and settings. Everything in the template is copied to the desktops.
You do not configure the agent: Luvio sends it its settings when it finalizes the template.
5. Finalize the template
Section titled “5. Finalize the template”On the template, click Finalize Template, then Finalize to confirm. The virtual machine can be running or stopped.
Luvio starts the virtual machine if needed, waits for its address and its agent, and asks the agent to seal the system: it removes what must differ from one desktop to another (the identity of the agent, its certificate, the machine ID on Linux). The agent keeps its pairing with your Luvio server: the desktops made from the template accept their settings from that server only, and refuse any other that reaches them first. Luvio then shuts the machine down and keeps a frozen copy of it. The progress window ends with “Finalization complete. The template is ready to use.” and the template shows Configured.
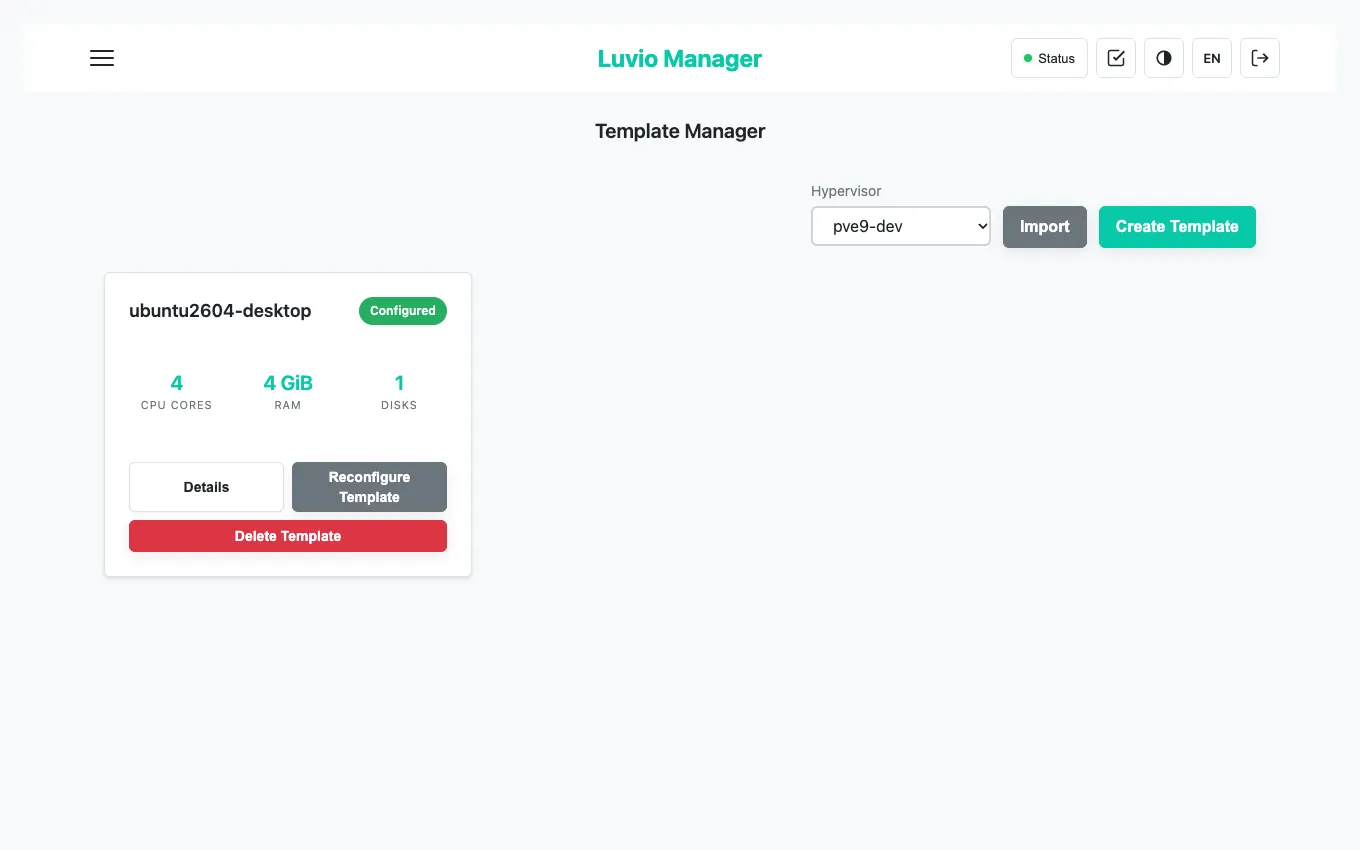
To change the template later, click Reconfigure Template, make your changes in the console, then finalize it again. New desktops get the new version.
Update the agent of the templates
Section titled “Update the agent of the templates”- Download the agent ISO of the new release (step 1): one for your Windows templates, one for your Linux templates.
- Open Administration > Updates. In the Agents card, drop the agent ISO. Luvio reads it, then copies it to the ISO storage of every enabled hypervisor: the storage of the template’s current agent ISO, else the hypervisor’s ISO storage. Drop it again to reach a hypervisor added later. Each copy is a task of the task list. Luvio refuses the ARM64 agent (it updates x86-64 templates), a file that is not a Luvio agent ISO, and an agent older than the one already dropped.
- On a template whose agent is older, click Update, or click Update all. Choose what happens to the users of the template’s Lightning Clone pools: they keep their desktop until they sign out, or they are signed out after a 5-minute notice.
For each template, Luvio then reconfigures it, mounts the new agent ISO in its machine, starts the machine, installs the new agent (a Linux machine restarts), finalizes the template again, and moves its Lightning Clone pools to the new version. The page shows where each template is; the task list has the update task of each template, and the reconfiguration and the finalization as their own tasks. Luvio updates two templates at a time; the others wait their turn.
If a step fails, the template’s update task says which step and why, and the template stays as the step left it: reconfigured, with its machine running, so that you can finish by hand (install the agent from the agent CD drive, then Finalize Template), or click Update again: Luvio goes on from where the template is. When only the move of a pool failed, the template is finalized with the new agent: update that pool from its details (Update Lightning source under Template changed).
A failed install of the Windows agent leaves the previous agent in place, running: the update says that the installer failed, with its code. The installer that runs that rollback is the one of the agent already installed: if it comes from an earlier Luvio release, a failed install can also remove the agent, and the update then says that the agent has not answered since a given time. Install the agent by hand from the agent CD drive, then finalize the template.
Update the agent of persistent machines
Section titled “Update the agent of persistent machines”The desktops of a Lightning Dedicated pool and the machines of an Existing Machines pool are not recreated from a template: Luvio installs the new agent in each of them, in place. In Administration > Updates, the Agents card lists these pools under Persistent machines, with how many machines still run an older agent.
- Drop the agent ISO as above.
- Click Update on a pool, or Update all (it asks whether to update the templates, the persistent machines, or both), or select machines in the pool’s Manage Machines and choose Actions > Update the agent.
- Choose when:
- Wait for users to sign out: the free machines are updated now, the others when their user’s session ends. A user who disconnected without signing out of Windows is not waited for: the restart of the install closes their Windows session.
- Log users out in 5 minutes: each user is warned on their machine, then signed out.
- Include stopped machines (checked by default): a stopped machine is started for its update, then stopped again. Unchecked, stopped machines are left out. A suspended (or paused, hibernated) machine is always left out: starting it would resume its user’s session, which stopping it again would lose.
Luvio updates at most four machines at a time per hypervisor, and takes no snapshot. During its update a machine is in maintenance: its user cannot connect, and their client says Your desktop is updating with Retry. Luvio mounts the agent ISO in a CD drive of the machine, installs the agent (a Windows machine restarts when its installer asks for it, a Linux machine always), waits for the new version, puts back the disc the drive held, and puts the machine back as it was: maintenance off unless it was on before, stopped if it was stopped, running if it was running.
On Proxmox and vSphere, a running machine with no CD drive is shut down once to get one, never forcibly. If it is still shutting down 30 minutes later (Windows installing its own updates, for example), its update fails, and Luvio starts it again once it is off (it waits up to 2 hours). The drive added stays in the machine, empty, after its update: removing it would shut the desktop down a second time. The next update uses it. A machine needs a paired agent: one that never acknowledged this server is not updated (AGENT_NOT_PAIRED) and is not started or shut down.
The machines page shows the version of each machine’s agent in its Agent version column, with available when the ISO is newer, and the update of the machine while it runs. A failed install leaves the previous agent in place: the column says failed with the installer’s code, and Retry on the pool’s row in Updates tries those machines again. Stop on the pool’s row leaves out the machines that were still waiting; the ones being updated finish.
Update an agent by hand
Section titled “Update an agent by hand”- A template: click Reconfigure Template, then edit it and choose the new Agent ISO; open the console, install the agent from the agent CD drive as at step 4, and finalize the template again. Then update its Lightning Clone pools from their details (Update Lightning source).
- A machine that is not recreated from a template (the desktops of a Lightning Dedicated pool,
the machines of an Existing Machines pool), on a hypervisor whose driver does not mount the
agent ISO (its update fails with the agent ISO could not be mounted): insert the agent ISO in the machine’s CD drive from
the hypervisor, and install it as at step 4: on Windows run
the MSI (it replaces the agent in place), on Linux run
install.shand restart the machine.
6. Create a pool
Section titled “6. Create a pool”-
Open Pool Manager and click Create Pool.
-
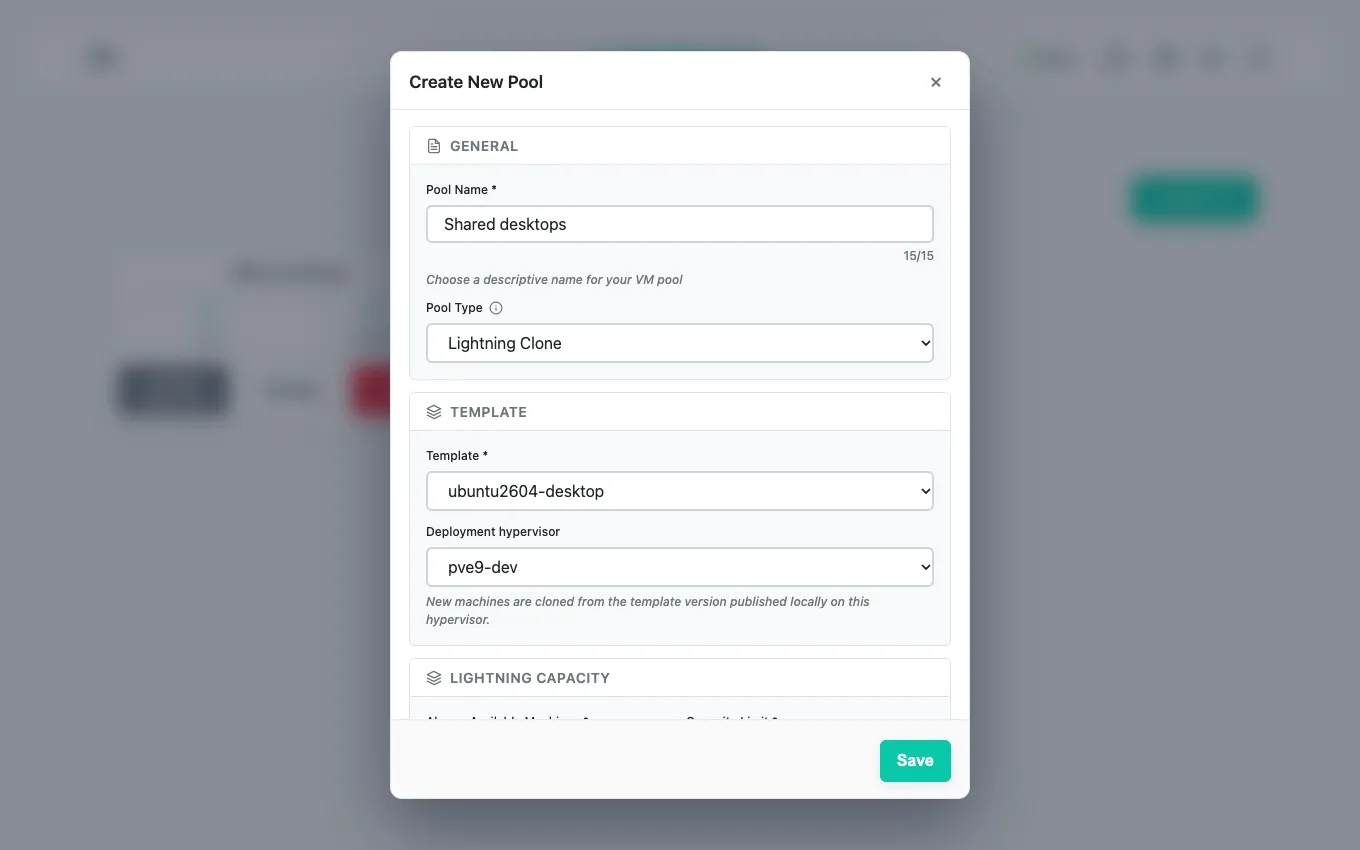
Pool Name (15 characters at most) and Pool Type:
Type Desktops Choose it for Lightning Dedicated Each user has their own desktop, kept between sessions. You create the desktops in Manage Machines > Add Machine and assign them to users. Persistent desktops Lightning Clone Fast clones made on demand from the template, recycled after use. You set how many are kept ready (Always Available Machines) and the maximum (Capacity Limit). Shared, non-persistent desktops Existing Machines Machines that exist already, added by hand (a hypervisor VM by an administrator). Luvio creates none. Machines Luvio did not create -
Template: the template of step 5.
-
OS session account: User enters credentials (the user signs in to the desktop’s system with their own account) or Pool credentials (one account you give here, signed in automatically).
-
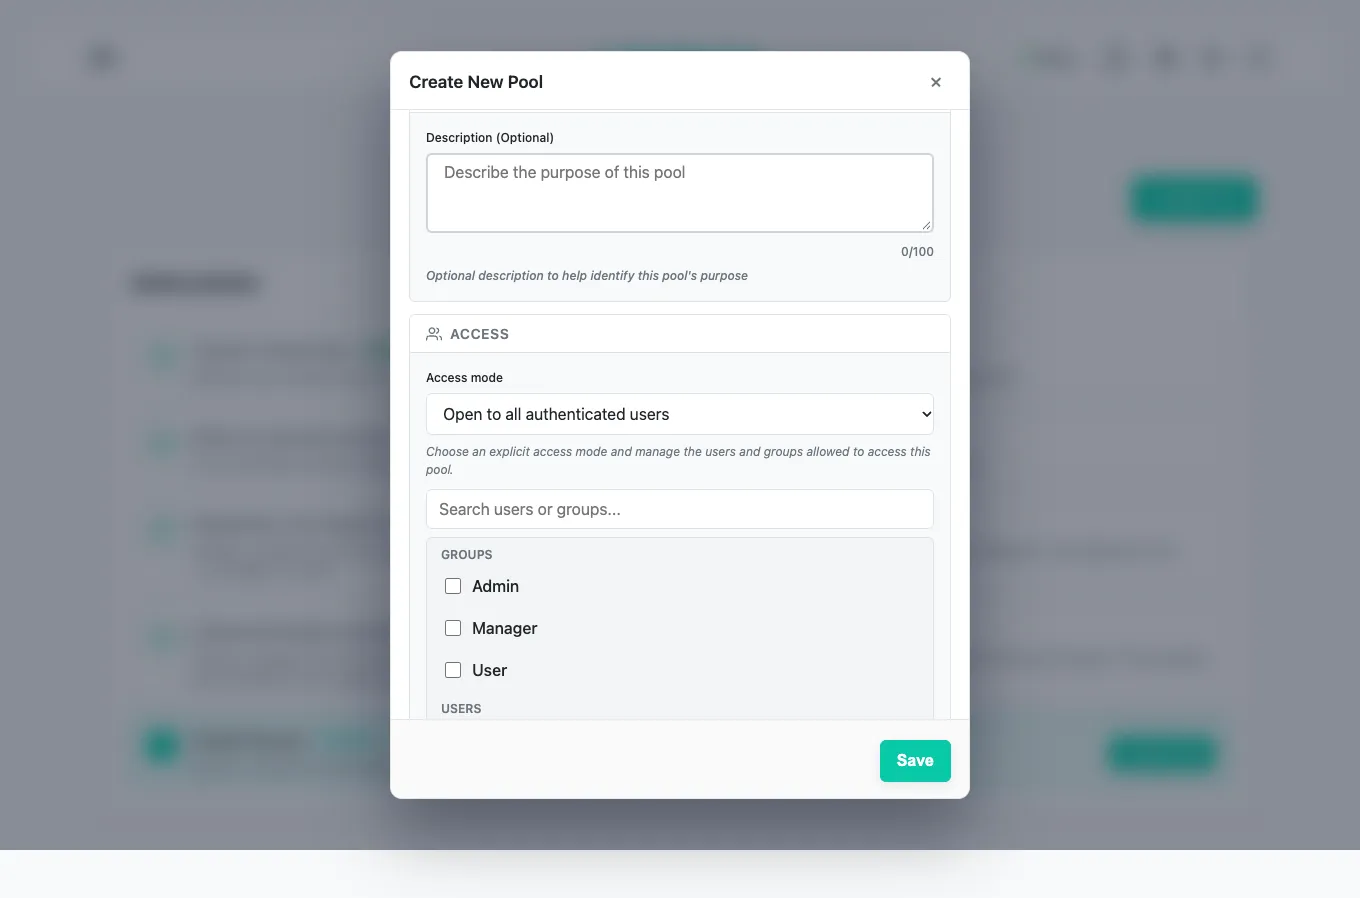
Access: Restricted to selected users and groups (then check them in the lists), or Open to all authenticated users.
-
Click Save.
For a Lightning Dedicated pool, then create the desktops: on the pool, click Manage Machines > Add Machine, give the Machine name, choose the VM disk storage and the user in Assign to user. Luvio clones the template and starts the machine; a full clone of a 50 GB template takes a few minutes. A user is given only the desktop assigned to them: a user with access to the pool and no desktop gets No machine available.
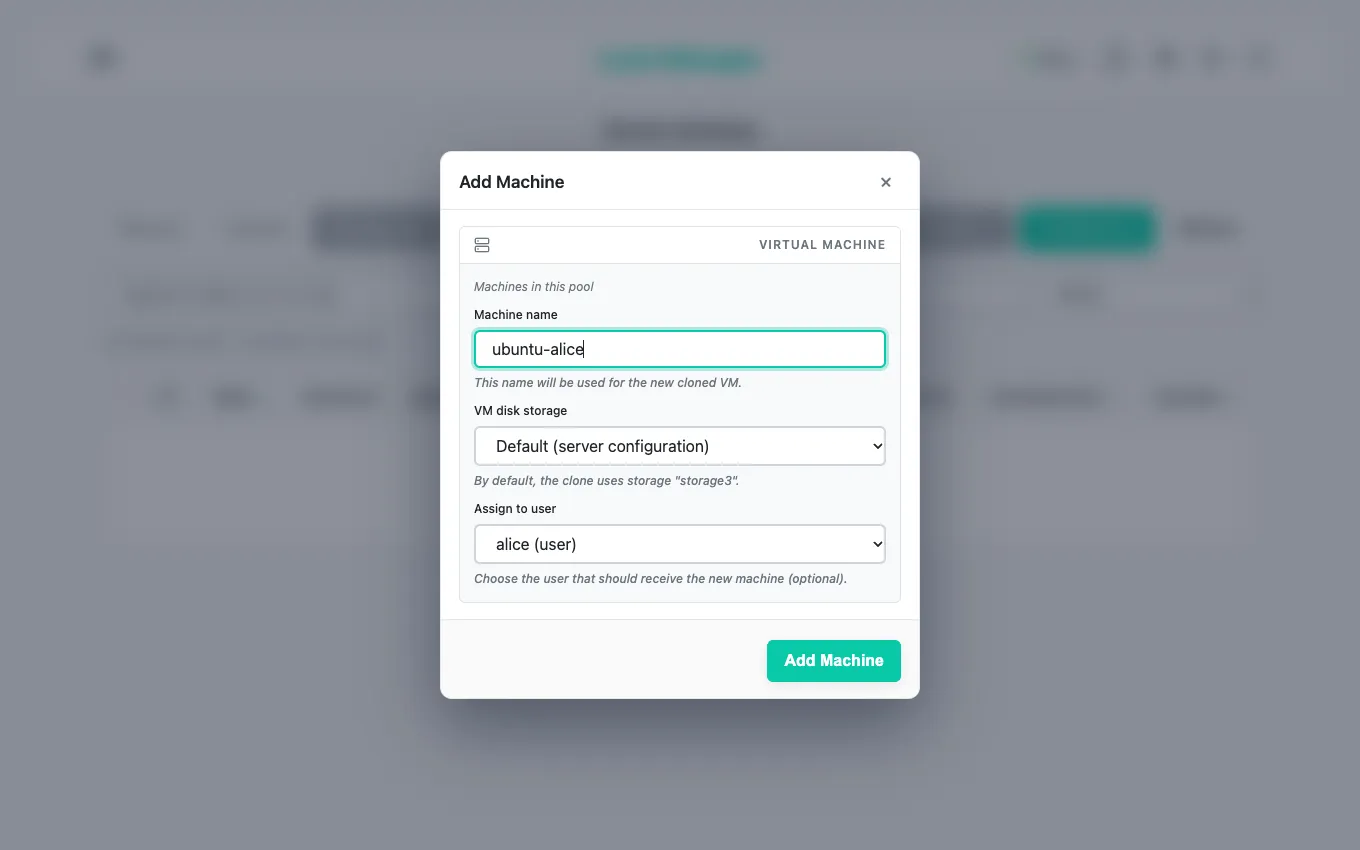
For a Lightning Clone pool, Luvio prepares the Always Available Machines by itself: there is nothing to add.
You change the access later in the pool’s Settings, tab Access.
7. Check the desktops
Section titled “7. Check the desktops”On the pool, click Manage Machines. A desktop is ready when its Status is running and its Luvio Agent column says Connected: the agent has received its settings from the server.
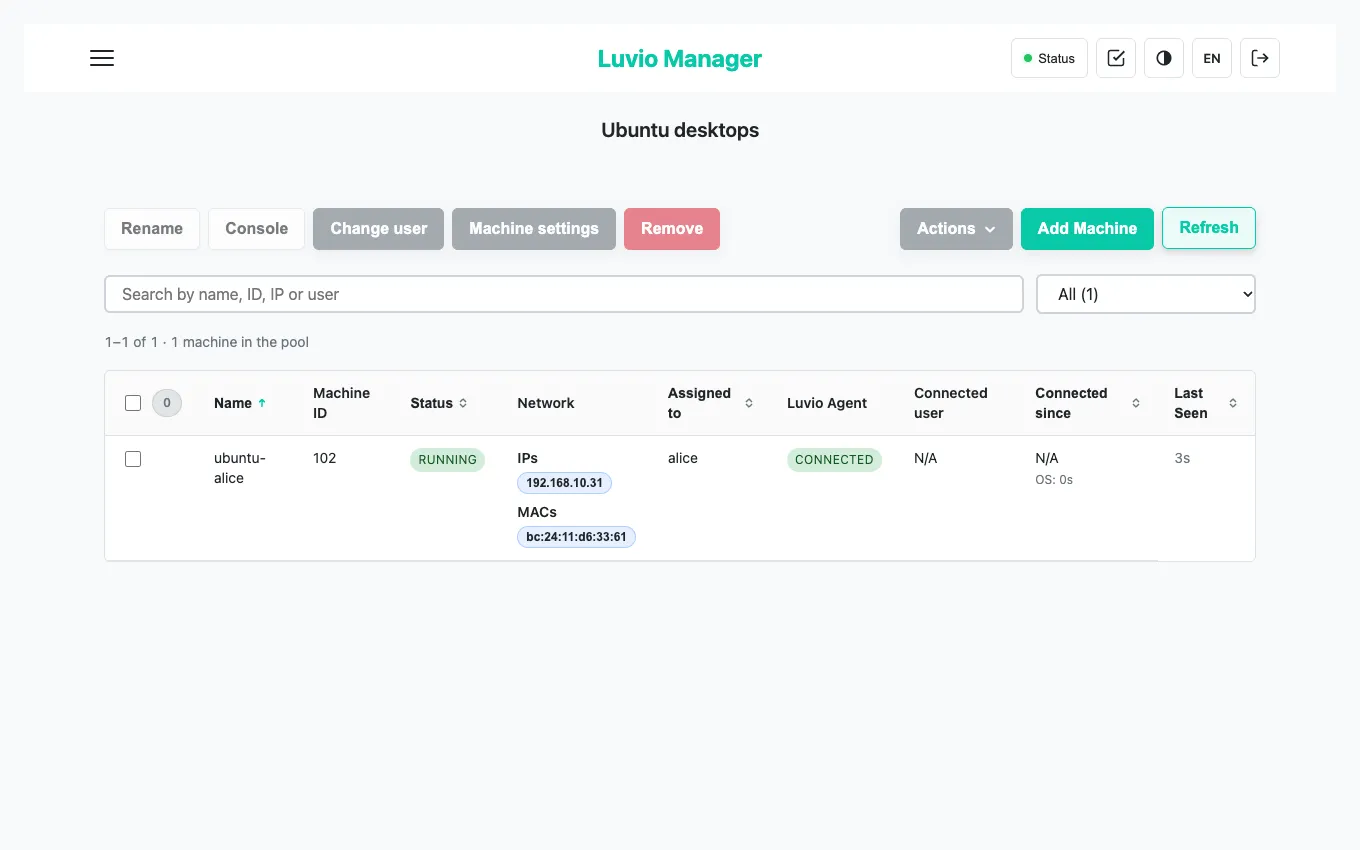
If it stays Not connected, see Troubleshooting.
Your users can now connect: Desktop client.
Use an existing virtual machine as a template
Section titled “Use an existing virtual machine as a template”If you already have a virtual machine with its system, its guest tools and the Luvio agent, an administrator can import it instead of creating one: in Template Manager, click Import, choose the VM to import, give a Template Name, the Operating system type and the Agent ISO (as at step 3, Luvio lists and selects the agent ISOs of that type), and click Import. Then finalize it. The list shows every machine of the hypervisor that this Luvio server does not manage, including those another Luvio server manages: pick the right one.
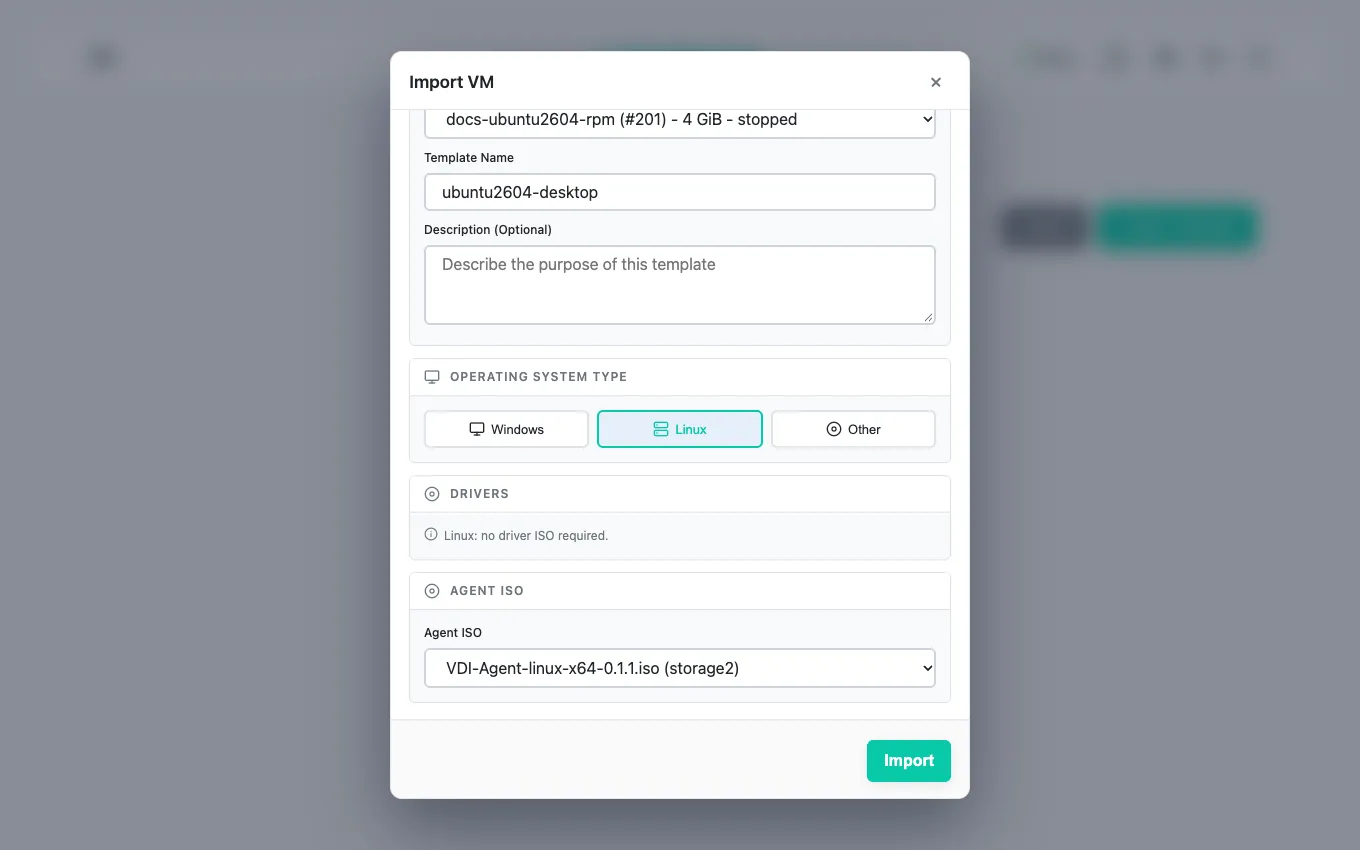
The agent of that machine must not be paired with another Luvio server. It is when the machine was a desktop or a template of another Luvio installation: a finalized template keeps its pairing. Reset it before finalizing, in the machine, as an administrator:
-
Windows, in an administrator command prompt:
"C:\Program Files\Luvio Agent\luvio-agent.exe" --reset-controller-auth -
Linux:
Terminal window sudo systemctl stop luvio-agentsudo luvio-agent --config /var/lib/luvio-agent/config.toml --reset-controller-authsudo systemctl start luvio-agent
Troubleshooting
Section titled “Troubleshooting”| Symptom | Cause and fix |
|---|---|
| Finalization waits for the address of the machine, then fails | The guest tools do not run in the template: install them (step 4). |
| Finalization says the agent does not answer | The server does not reach the template on TCP 8081: the agent is not installed or not started, or a firewall blocks the port. |
| Finalization says the agent is paired with another Luvio server | Reset its pairing (Use an existing virtual machine). |
| Finalization or the update of the agent says the clock of the machine is N minutes off | The agent refuses what the server signs when the clocks of the machine and of the Luvio server are more than 5 minutes apart. Fix the time of the machine: enable time sync with an NTP server or with the hypervisor (Windows: the Windows Time service, w32tm /resync; Linux: timedatectl set-ntp true), check its time zone (Windows reads the hardware clock as local time, the hypervisor often sets it in UTC), and check the clock of the Luvio server too. Then finalize, or click Update, again. An agent older than this release says only auth failed: Luvio then reads its clock from its answer. |
The desktops of a template stay Not connected, and the Luvio server’s log says their agent refused its settings with controller key mismatch |
Their agent is paired with another key: the template was finalized by another Luvio installation, or the key of your Luvio server changed (a new installation, a database restored without it). Click Reconfigure Template, reset the agent’s pairing in its machine (Use an existing virtual machine), finalize it again, then recreate the desktops made from it (or reset the pairing in each). |
| Desktops stay Not connected | The agents cannot reach the Server URL (Administration > Server & storage) on its port, or the server cannot reach them on TCP 8081. Fix the address or the firewalls, then use Resend Agent Config in Manage Machines. |
The server log says the agent refused its settings or a command with missing auth or signature v5 required |
The agent and the server are not the same release: upgrade both (step 5, Upgrade Luvio and every agent together). |
The server log says receiver mismatch and names what the agent answers to (boundTo) |
The machine’s identifier changed in Luvio (its hypervisor was removed and added again, or an external machine was removed and added again): the agent still answers to the old one and refuses the new one. Resend Agent Config for that machine in Manage Machines gives the agent its new identifier. |
| A machine reassigned to another user is never served to them, and Manage Machines says under its Connected user that the new user is waiting for this machine | The previous user is still recorded on it: their desktop client left without releasing it (closed, crashed, asleep, offline). Select the machine and use Actions > Session > Log the user out: once their session is closed, the machine goes to the new user. On a Linux machine the reassignment closes the previous user’s session itself and the machine goes to the new user without this; it waits only if that session could not be closed, or if the previous user was at the sign-in screen: they may be signing in, so the machine waits until their client disconnects (if it was killed, until they connect and disconnect again). |
Repairing the Windows agent (msiexec /fa with its product code) fails with error 1706 |
The agent was installed by an update (Administration > Updates), which copies the MSI to the machine and deletes it once installed. Windows Installer then looks for it in the CD drive, and finds it only if the drive holds the agent ISO of the installed version. Insert that ISO and repair again, or run msiexec /fvomus D:\Luvio-Agent-windows-x64-<version>.msi /norestart in an administrator command prompt (replace D: with the letter of the drive labelled LUVIOAGENT_X64). |
| Upload Agent ISO fails | The ISO storage is full or not shared with the node: choose another ISO Storage. |